Those who work from home need the maximum possible productivity, and on a desk that can mean two monitors. A Mac with a nice extra screen can help you open more windows at the same time, saving you a lot of time. clicks and gestures.
But you may have doubts about this second monitor before switching to an additional screen, so we will explain how to do it. a second “test” monitor with an iPad that you have on hand
Sidecar, or the magic of transforming your iPad into an external screen
First of all, here are the compatible Macs to be able to use the iPad as a second screen for the Mac:
- MacBook Pro from 2016 or newer models
- MacBook from 2016 or newer models
- MacBook Air from 2018 or newer models
- 2017 or newer iMac, or late 2015 27-inch Retina 5K iMac (iMac Pro also included)
- Mac mini from 2018 or later models
- mac pro 2019
- mac studio
The iPads that can act as a second screen are:
- All iPad Pro models
- iPad 6 or newer models
- iPad mini 5 or newer models
- iPad Air 3 or newer models
Also, Mac and iPad must be set up correctly with the same Apple ID and work under the same Wifi network. Only then can we take advantage of the macOS tool called Sidecar, which allows us to turn the iPad into a secondary monitor. Note: you must have macOS Catalina and iPadOS 13 to continue.
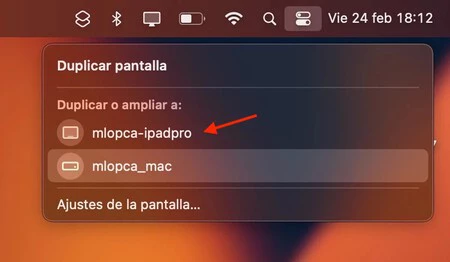
At this point, all you need to do is unlock the iPad and immediately open your Mac’s Control Center and click on the ‘Mirror Screen’ button:
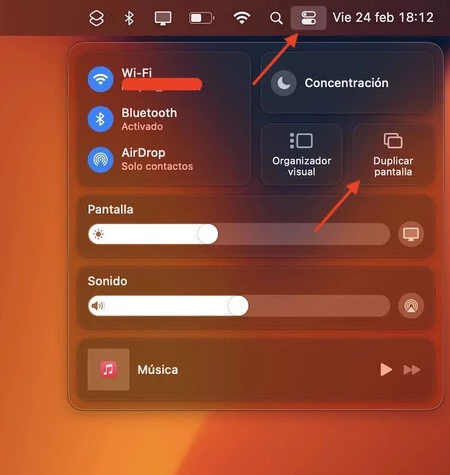
One or more options will appear depending on the devices you have. Just select the iPad:
You’ll see that all of a sudden the Pad will show you the extended Mac desktop and you can drag macOS windows onto it. Experiment: you might get used to it and find that a full second monitor can really work for you.

Moreover, you can also use Sidecar by connecting iPad to Mac by a thread, although for this you will need to have previously connected it and tell the Mac that you trust the connected device. The most comfortable, however, is to take advantage of the wireless connection.