Our smartphones are used to do a thousand and one things, and communication with other people is the basis of many of them. These other people are represented on the mobile in the contacts, and it is important don’t lose them when switching from one mobile to another.
There are plenty of apps for managing, importing, and exporting contacts on Android, although one of the most effective and easy methods is always through a Google account. If this is an option that does not suit you, we will see how to do it the traditional way, exporting contacts as VCF file.
Via the Google account
If you are planning to switch to a different mobile but keep the same Google Account, the good news is that in general Contact synchronization with this account and therefore you may not have to do anything. That said, it’s worth checking that everything is set up correctly just in case.
The contacts of an Android mobile can be saved in different media such as in mobile storage, in the SIM card or in online services such as Google, Huawei, Samsung or many others. To send all your contacts through a Google account, you must first copy them all to your Google account.
First, copy everything to the Google account
Each Android manufacturer includes their own version of the Contacts app, so appearance and functions may vary. To make this tutorial more homogeneous, we rely on the application Google Contacts, accessible to everyone on Google Play.
After opening the app, display the side panel and enter the section of Settings. Inside, press import and you will see a window with the available options. If you have contacts saved on the SIM card, choose it to import them into the Google account.

What if you have contacts in other media, like in the phone’s internal memory? Then you need to use the official mobile contact app to transfer them to the Google account. Such an option may not exist, so the process will consist of two parts: export the contacts to a VCF file and then import them with the official Google contacts app.
 Huawei Contacts app allows you to copy them to Google account
 At this point, all your mobile contacts will already be copied and synchronized correctly in your Google account. As long as you change your mobile, they will always be there as soon as you log into the same account on the other mobile.
Then use the same Google account on the other mobile
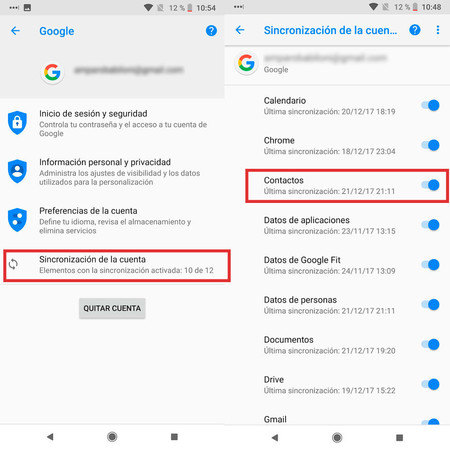
On the second mobile, you have nothing to do except use the same google account. Normally, account sync – including contacts – is enabled at the factory, although if they take a while to appear you can go to Settings> Accounts> Google, tap the account in question, and verify that contact sync is active and working.

You will then have the contacts of the initial mobile in the second and synchronized in near real time. If you edit, delete, or add contacts to one, the same changes will apply to the other. This, as long as you keep the Google account in both and they are connected to the internet.
Export contacts
What if for some reason you’d rather not use a Google Account? So you will always stay export contacts in the form of a VCF file, a standard supported by almost all mobile phones, Android or not.
Again, pretty much any contacts app will let you export them, although if you didn’t – or you can’t find the option – you’ll still have the Google Contacts app. In this is done by entering Settings and pressing Export. Without further ado, a box will open for you to choose where you want to save the VCF file with your contacts.

So you have to transmit the VCF file to the other mobile, which shouldn’t be a problem because they don’t take up too much space. You can use Bluetooth, Wi-Fi Direct, WhatsApp, Telegram, or any other method you want.
Miss you then import them on the second phone. You can also do it with the Google Contacts app, from the same settings but this time choosing import. Then choose Archivo .vcf and you need to select it from mobile storage.

Import is complete no other questions and without being able to choose which contacts to import and which not: all are imported. If some of them that don’t interest you are included, you can always remove them later.
Table of Contents


