For certain procedures with the Treasury, such as the presentation of the 2021 income statement, it is necessary obtain a digital identity certificate which allows us to act in our own name. The truth is that this system has been available for a long time, but at least it never caught my eye because “it doesn’t work on Mac”. Well, it turns out it does, it even works on the iPhone and iPad. Let’s see how to use it because you will save a lot of time and effort in management.
Once we have uploaded the ready-to-use digital certificate
Although the digital certificate that we can use at the Treasury has been available for a few years, everyone knows that Internet Explorer is necessary on a PC, right? Well, it turns out not. As much as the tax administration itself or the Social Security Treasury tell you over and over again, Firefox is only mentioned on the tax administration site, as much the truth is that the certificate works perfectly in Safari on all Apple devices
In this tutorial, we will start from the point where we have already downloaded the digital certificate. Just as a very brief reminder to mention that the certificate must be requested online and then, after a visit in person to a Social Security office to verify our identity, we can download the certificate on our iPhone, iPad or Mac. This certificate is accompanied by a password, without which it would be useless. Located at the moment the certificate is in our downloads folder and the password written and by hand, let’s see how to install said certificate.
How to install the digital ID certific ate on our Mac

The steps to install a digital ID certificate on Mac are very simple. The first thing we need to do is open app Keychain access. We will find it by searching in Spotlight (Command (⌘) + Spacebar) or inside the folder Utilities in Apps. Then the steps are as follows:
- in the sidebar of Keychain Access we select login keychain.
- We drag the certificate, usually with a .pfx extension, to the right side of the window.
- We enter the certificate password.
As simple as that. Let’s keep in mind that this certificate is not synced via iCloud, so it is very important to keep the saved .pfx file to be able to install the certificate on another Mac or after restoring it. Having it always at hand will save you a lot of trouble in the future.
How to install a digital ID certificate on our iPhone or iPad

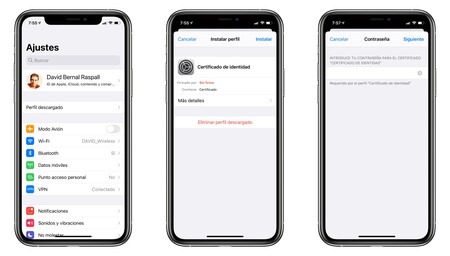
On iPhone or iPad, the process is even simpler. The difference is that on devices with iOS or iPadOS there is no app Keychain Accessotherwise what it’s the same app Settings the one who manages the installation of certificates. In this case, to install our identification certificate, we will follow these steps which are detailed below:
- We locate the certificate, from the Files application, and touch it to open it.
- If we are asked where we want to install it, we choose iPhone O iPad.
- Before the notice of uploaded profile we touch Close.
- We open the application Settings on our iPhone or iPad.
- At the top, under our name, we tap on uploaded profile.
- we touch Install.
- We enter the password of our iPhone or iPad.
- If we see a notice that The profile is not signed we touch Install and confirm by replaying Install.
- We enter the certificate password.
- we touch Following.
- We press Okay .
And that’s all. With these steps, the digital identification certificate will be installed on our iPhone or iPad ready to be used in any procedure. As before, it is very important that let’s keep the certificate file safe with your password to be able to reinstall it.
And now, how to use this digital certificate on Mac, iPhone or iPad?

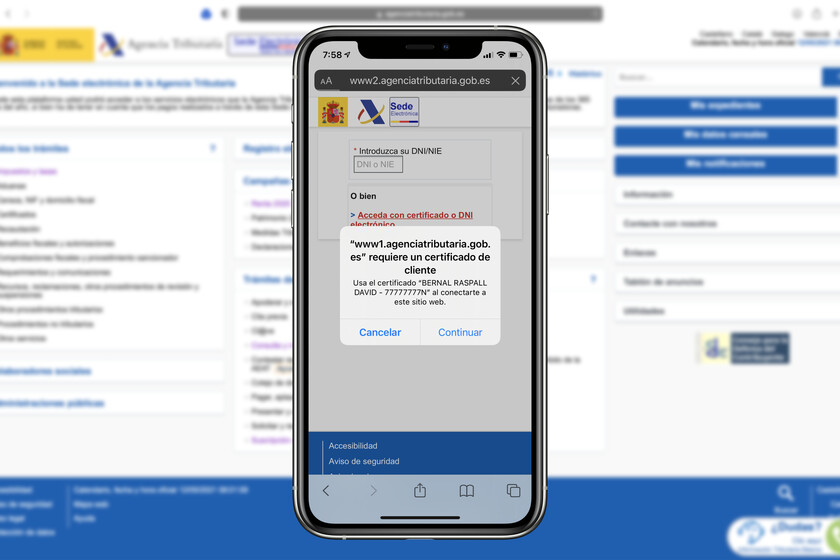
Very easy. We open Safari, enter the Tax Agency website, for example, and look for the procedure we want to perform. When you ask us about identification method we are discussing Digital certificate.
Safari will ask us, the first time only, to give it permission to use the certificate. It is something that we will do by touching the corresponding button. In the case of the Mac, Safari will present us with the following dialog box. Simply We choose the certificate we want to use and click on Continue.

In the case of the iPhone, the first time we use the certificate, we will see the following notice. like on mac we just played Continue.

That’s all. The truth is, it was quite surprising to learn that these certificates work so well on iPhones and iPads as well as Macs. Now that there are more and more procedures that we have to do online, we can have an identification tool like this, the one that we can use directly on our iPhone with a single touch, is very useful.
Table of Contents


