The iPhone camera is still among the highest TOPs on the market. photographic quality and number one in video recording. It has always been a reference and model after model it is improved with new functions.
One of them is the iPhone 15 Pro Max’s zoom. In this article we will give you several tips so that your photos are even better. Additionally, many of these tips are compatible and fully functional with previous iPhone models.
Framing photos well is our first tip for the iPhone camera
It is said that there is no good or bad camera, only a good or bad photographer. This is why the first tip is not related to the iPhone camera itself. And yesComposing a good photograph is essential to obtain an excellent result.
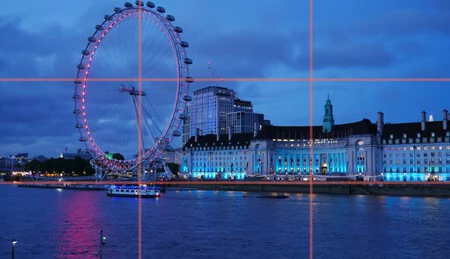
iPhone can help you with the ‘grid’ function on which to base your photographs rule of thirds. This rule is a basic photographic principle and so we should consider it the first tip to get better photos with your iPhone camera.


The rule of thirds applied to the London Eye
The intention is that the object to be photographed, whether it is a person, a landscape, your pet… is always at one of the points where the lines touch of the grid, it will therefore always be located on one of the sides.
The purpose of this rule is please our eyes and our minds moresince he is always more attracted to diagonals and asymmetries, which are generally out of the ordinary. And how do humans see? Always with everything centered, wherever we look, it’s always in the center.


Rule of thirds applied to Teide
Enable the grid on your iPhone
To help you better frame your photos, I recommend enabling the grid on your iPhone. To do this, go to Settings > Camera > Grid
Of course, there are exceptions. Some photographs need to be perfectly symmetrical and flat., especially with geometry or architecture. In fact, this will be the second iPhone camera tip that we are going to cover today.
Take photos from above and horizontally using this iPhone setting
Another very interesting style of photography is aerial (top view) and horizontal photography. Once again, the photo is out of the ordinary and shows us a different style than what we are used to. And we already know that the eye likes it. This type of photography is very useful for objects and gastronomy.


Levels in iPhone Camera
The iPhone has a neat trick for making sure the camera is completely upright. You just have to go to Settings > Camera > Level. After activating it, when you position the iPhone horizontally or from above, you will have a level and a cross to know that it is completely straight. All you have to do is shoot and surprise!
Do you look weird in this selfie? Use This iPhone Camera Trick to See Yourself Better
This has happened to all of us: we look great on the iPhone screen and as soon as we take the photo, bam! What happened here? iPhone “rotates” photo by default that we just made to simulate how people see us in reality. What happens is that we generally don’t like seeing ourselves like this because we’re not used to it. It’s like seeing yourself in a mirror.
To keep the photo exactly as you see it on your iPhone screen, go to Settings > Camera > Preserve mirror effect. So, you will surely upload your selfie to Instagram.


Be careful with the optical zoom, the iPhone camera may play tricks on you
For many generations of iPhone, we have had two to three cameras that allow us greater versatility when taking photos. This is particularly visible in the zoom. For example, he The iPhone 15 Pro Max has 5x optical zoom, the iPhone 13 Pro a x3. This type of zoom is very useful to reach where we physically cannot get close and also to achieve more professional framing. I admit that I almost I use x2 zoom more than x1 on my iPhone
What is happening? These zooms They are usually darker than the main camera x1. So, as soon as the iPhone detects that there is little light in the room or in the landscape, it switches from zoom to the main camera and gives you a digital cut photography. In theory, this is to get better light, but thThe result is a very pixelated photographsince a digital zoom was applied instead of an optical zoom almost without realizing it.
How to notice it? Well, at first glance you will see in the camera that even if you are on an x2 / x5 everything is seen with little clarity. Another tip is move the zoom wheel and notice if there is a “jump” between one camera and another. If there is no jump, this means that the iPhone has not changed cameras and you will need to find an area with more light to be able to use it.


If there is enough light, you will notice a jump between one camera and another. In this case, even if you select the x5, the iPhone does a digital crop
Over the years, this is one of the best iPhone camera tips I’ve given, and one of the things I’ve learned. we need to be more attentive. I hope that Apple with iOS 18 will allow us choose which camera to use regardless of the amount of light, but in the meantime you have to be careful.
The special one exception that can be made with the zoom and using it completely normally is the 2x zoom for iPhone 14 Pro, iPhone 15 and iPhone 15 Pro
|
Zoom x1 |
ZOOM x2 |
ZOOM x3 |
ZOOM x5 |
|
|---|---|---|---|---|
|
iPhone X/XS |
Day Night |
Day |
– |
– |
|
iPhone11 |
Day Night |
– |
– |
– |
|
iphone 11 pro |
Day Night |
Day |
– |
– |
|
iphone12 |
Day Night |
Day |
– |
– |
|
iphone 12 pro |
Day Night |
Day |
– |
– |
|
iPhone13 |
Day Night |
– |
– |
– |
|
iphone 13 pro |
Day Night |
– |
Day |
– |
|
iphone14 |
Day Night |
– |
– |
– |
|
iphone 14 pro |
Day Night |
Day Night |
Day |
– |
|
iphone15 |
Day Night |
Day Night |
– |
– |
|
iphone 15 pro |
Day Night |
Day Night |
Day |
Day |
Choose when you want to take a macro photo with your iPhone
Starting with the iPhone 13 Pro, all iPhone models in this range have the ability to take macro photos. These types of photos are useful when an object is very close (about two centimeters away). Therefore the macro photography is great for capturing textures like webs or flowers.


Intermittent macro photography
In this case we are presented with something similar to the previous trick, namely that the iPhone camera automatically changes when detects that it is close to an object. It therefore goes from x1 to x0.5 which is the ultra wide angle camera. This may seem useful, but I have also encountered many photographs that really didn’t want to be macro photography.
The camera x0.5 is lower quality than x1, both in resolution and brightness. This is why it is important to know how to control when to enable macro mode or not. To do this, go to Settings > Camera > Macro Control. From here, when you’re in the x1 camera and approach an object, you can tap the flower icon to turn the macro camera on or off.


With this trick you can take 48 megapixel photos on your iPhone
Finally, we are going to see a tip with the iPhone camera that will allow you take photos at 48 megapixels without completely filling up your iPhone’s memory. Since the iPhone 14 Pro, iPhones have had a 48-megapixel sensor in the x1 camera. Yes, the iPhone 15 and iPhone 15 Pro too. What is going on ? By default, The iPhone takes photos at 12 or 24 megapixels, never at 48 mpx unless you specify it. To obtain it, go to:
- Settings > Camera > Format Resolution Control and ProRAW
- Default professional format
- Choose maximum HEIF 48 megapixels
Finally, when you go to take a photo, remember to activate and deactivate this option at the top right of the camera interface. Now, after experiencing these Six tips with your iPhone camera will surely take your photos to the next level.
In Applesfera | iPhone 15 Pro and iPhone 15 Pro Max, analysis: new milestones in the high-end
In Applesfera | New iOS 18: release date, news, compatible iPhones and everything we think we know about the new version
Table of Contents


