When you buy a plane ticket, a ticket for a concert or to see a movie at the cinema, adding it to the Wallet app on iPhone is usually the most convenient. You will always have it at hand, and normally when there is little time left before you need to use it, it will appear permanently on the lock screen as a notification. When you tap it, the pass will show on the screen with the QR and the brightness will go up to 100% for easy scanning.
The truth is that this system makes everything much easier. It allows you to forget about the typical paper ticket that gets wrinkled, torn or lost. QRs from your Wallet app will always be on your iPhone and never leave it. Only you have them, while a paper ticket can be lost and someone else can use it for you. These are pretty much all benefits, although it is true that if your iPhone runs out of battery or stops working you may have a problem, but the chances of this happening are extremely low.
It’s simple, but you have to be careful
As we have already said, this system is very comfortable, but some companies still do not support it. A priori, it may seem that nothing can be done in these cases, because the Wallet application does not provide any native way to add a QR code, but in reality, it is possible. The only thing we will need is a third-party app. There are many that serve this purpose, but not all of them respect privacy like Apple does.
After studying the different alternatives that exist, the one that respects the privacy of the user the most (although it does not do so 100%) is Pass2U. Its operation is simple. Simply scan the QR code or barcode of your choice and convert it into a card compatible with the Wallet app. From there the iPhone itself lets you add it to your wallet.
Adding your QR code to Wallet with this application is simple, but we recommend that you do not give unnecessary data
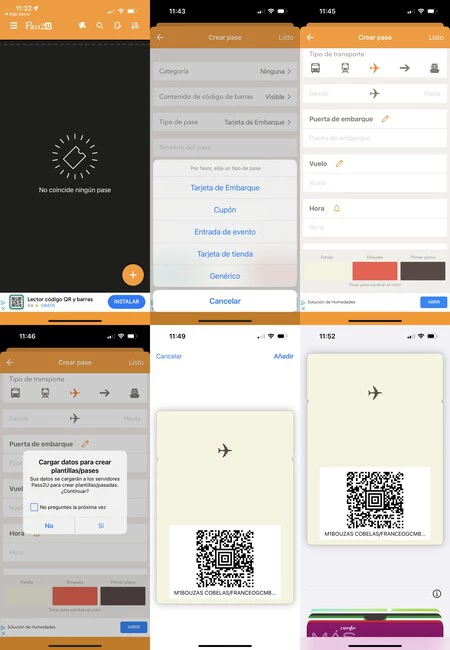
To use it, the first thing to do is download it. Once you do, the app will open and you’ll see an orange and black screen with a + button in the bottom right. To create a new pass you will have to give it there and follow the instructions:
- If you have a printed barcode or QR code and want to scan it, select the “Scan barcode on card” option.
- If you have the barcode or QR code in a photo on your iPhone, you should select “Get Barcode in Photos”.
Once we have added our code to the application or scanned it, the application will ask us if we want to convert this QR into a format compatible with Apple Wallet. We will give you to confirm and it will ask us what type of pass it is. There are different options: boarding pass, coupon, event ticket, etc. If none matches your case, just select the “Generic” option.
Once this step is completed, we have the opportunity to fill in information. In the event that we add a boarding pass, we can complete it with our name, flight number, seat, departure time, country of origin and destination, etc. It is not necessary or recommended (now we will explain it) to fill in this data if you don’t want to, but the possibility exists.
At the end we can click on “Ready” at the top right and it will ask us for permission to send our data to its servers to create the pass. Obviously it’s not a good thing, but we have no choice but to accept if we want to create the pass. It is better not to add additional datasimply the QR that we want to convert into a format compatible with Wallet, so we know that our data remains private.

When we accept, the pass will be generated, something sober but useful, and we can add it to the top right. Once we do this, we can now verify that it appears in our Wallet application. It will be enough to simply press the power button of the iPhone twice to open the passes we have, select it when we need it and let it scan.


