From time to time, users who love it so much iPhone we take the big leap to a new model. Logically, when we start it, it has no configuration, and putting everything to our liking can be a long and tedious process. It is not only about adding our iCloud account, but we also have to download applications, configure them one by one, place them on the home screen, add widgets … a lot of work that we can save if we want.
I think it’s important to emphasize that this is optional. There are people who prefer to start from scratch with a clean installation and no possible imperfections. This is not something that has to happen, but there is always the possibility that at transfer data from one iPhone to anotherif the source device has a small configuration error, it is carried over to the new one. This being explained, everyone must evaluate the advantages and disadvantages of each option.
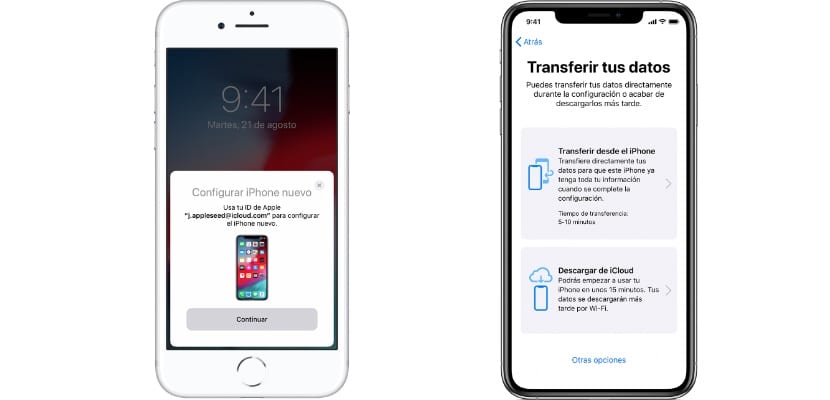
Until the release of iOS 12.4, which came in 2019, the options were different. We could save a backup copy of the source device in iTunes and recover it on the new iPhone, but it was not the most reliable – due to the change of model – nor the most practical. This iOS 12.4 introduced an option called “Transfer your data” that will allow the new device to use the settings of the previous one so that we can enjoy the new device with everything in its place.
How to Transfer Data from One iPhone to Another

To perform the procedure, we only need two things: the old iPhone, which is the one we want to clone, and the new one, to which we want to transfer the data. The new one must be unconfigured, with the classic blank initial screen that can read “Hello” in several languages. With both devices at hand and one close to the other, the process would look like this:
- We place both iPhones next to each other. If the battery is low, it is a good idea to plug it into a power outlet. In fact, it does not hurt to connect them even if they have a battery.
- We begin the process of setting up the new iPhone.
- We select the language we want to use.
- On the old iPhone, a window will appear showing the possibility of using it to set up the new iPhone. Here we click on “Continue”.
- Now we take the old iPhone and scan the point cloud that appears on the screen of the new iPhone with its camera. This point is similar to what we see on the Apple Watch when we want to pair it with our iPhone.
- After successfully reading the information from the cloud, the setup process will begin. Everything is automatic.
- At several times we will have to enter some data, such as the unlock password of the old iPhone or the password of our iCloud account. These are security measures to prevent anyone from cloning our iPhone.
- Once the credentials are entered, the transfer of data from one iPhone to another will begin, a process whose duration will depend on the amount of data to be transferred. In my case, it took about 20-25 minutes, at the end of which I had two iPhones with the same content. It even transfers the connection from the Apple Watch to the new iPhone.
Using the cable

Procedure can also be made with cablewhich is recommended if our internet connection is slow. The problem is that if we want to transfer data from an iPhone with a Lightning connector to another with USB-C, because we have to find an adapter. If we need to go from an iPhone 15 to the next 16, both with USB-C, finding the cable will be easier.
Is there any reason not to take the step?
Apple is a reliable company and when it launches tools like these, it does so with all the guarantees. Now, I would not transfer data from an iPhone that presents a problem to another new one.
Although the error can be corrected during the process, it is also likely that it will accompany us to the new destination. If the previous iPhone works well and we want to save time on manual configuration that can last for hours, using Apple’s tool is the best we can do.


