Location History is coming enabled by default in our Google account. Thus, Google collects information about our movements and trips to show us better recommendations and personalized experiences. For users, it is an excellent function to remember the routes and places we have visited.
In our Google Maps timeline, we can review all of this and even manage location history. as much as you want remove how to disable it completelyThis is how it is in the official Google Maps app for Android.
How to access your Maps timeline
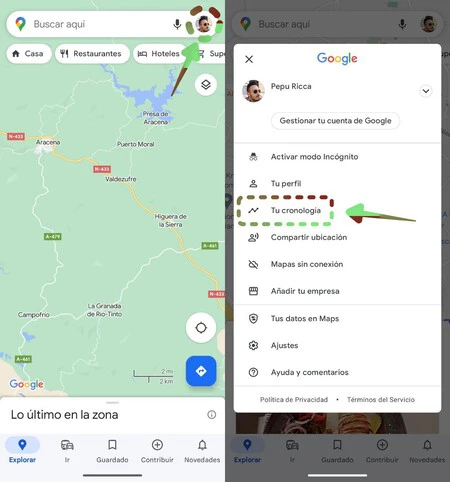
To quickly access our Google Maps timeline, just open the app and click on our profile picture. The account options will be displayed, among which we will see “Your timeline”, we touch it to direct access.

We will now be presented with a summary of the current day, with routes and places visited. From here we can perform different actions with all this information.
Manage the timeline: fix errors and add more information
Sometimes, and although the Google service is very smart, we find errors in a trip or a place we visit. Similarly, Maps may show us incomplete information that we can complete.

When you select the day in question, you can see an itinerary marked with a red question mark and the message “A tour is missing”. Press “Add a visit” to complete the information, adding the place we visited. We can also change the means of transport in case the information is not correct.
Add notes to identify the day
Google Maps and its Timeline allow us to add notes which we use to identify that day without consulting more information. For example, if we went hiking on the weekend, we can add a note that day with the name “Mountain hike”.

This gives endless possibilities, since the user can write any message you need. Thus, locating certain moments of our life would be easier.
View details of a site you’ve visited
In our timeline, we will see the places we visited. If you want to see more information about a specific location, tap the three dots that appear to the right of each location, then tap “View location details.”

We’ll see detailed information such as photographs, times you’ve been there, and options for save it, share it, tag it or edit it.
Delete or completely disable location history: improve your privacy
If we worry our privacy and we don’t want Google to follow us everywhere, we can always delete the recorded history up to the present moment or deactivate it so that it does not continue to collect our information.

To perform these actions, we have four choices:
- Delete a particular day: Tap the “More options” button illustrated by three vertical dots at the top right of our Timeline’s main screen. Then click on “Delete the day”.
- Delete all location history: To delete all data saved in Maps, we will use the same route. More options > Settings and privacy. On the next screen, scroll down until you see “Delete all location history”. Tap it to delete your entire timeline from Google’s servers.
- Delete a time period from Location History: in the same way and in the same place, we can choose to delete only part of our history. Thus, we will only remove a certain period of time that we establish.
- Automatically clear history: Google Maps gives us an option for the Timeline to be automatically eliminated. Again, in the same options menu, we will see the option “Automatically delete location history”, which will show us a new screen where we can establish that the saved locations are deleted if they have more than 3 , 18 or 36 months.
- Disable location history: On the same “Personal Content” screen, Google binds us to disable location history. This option can be accessed by tapping “Location history is on”. Then we will choose our Google account and this will take us to the configuration. Press the “Disable” button, we slide down and press “Pause”.

All this is what the Google Maps timeline allows us to do. As we can see, it is useful to keep it activated, although for some users who want to maintain their privacy, they do not see it as something positive. At any rate, we can change itadd new information or, if we prefer, deactivate it completely.
Table of Contents


